With all the milk I'm getting from Matilda since
little Amy was born, I'm back in full dairy mode and having the time of my life. This is a long post, so grab a cup of tea and follow me on this picture tutorial as I make cheddar cheese.
I haven't been able to make cheese for several years since I haven't had enough milk, so I figured my cheesemaking skills would be a little rusty. Fortunately making cheese is sorta like riding a bicycle -- once you learn, it's hard to forget.
That's not to say I would ever be without my trusty
cheesemaking book. Since getting this book, my cheesemaking has become far more successful.
It offers detailed step-by-step instructions that make the process much more understandable. In this instance, I use the recipe for "Traditional Cheddar."
Cheddar cheese requires a mesophilic culture. I had some cultured, but it was quite old -- dating back a few years to my last cheesemaking endeavors -- but I decided to risk using it anyway.
I've since ordered some fresh starter (mesophilic is for cheddar and other cheeses; thermophilic is for mozzarella and other cheeses; and fresh is for cottage cheese and other cheeses); however I haven't had a chance to culture it yet.
Cheesemaking isn't hard, but it requires patience and the whole day at home. It's a lot of "take this step and wait 45 minutes; then do that step and wait 75 minutes." Not hard, just lengthy.
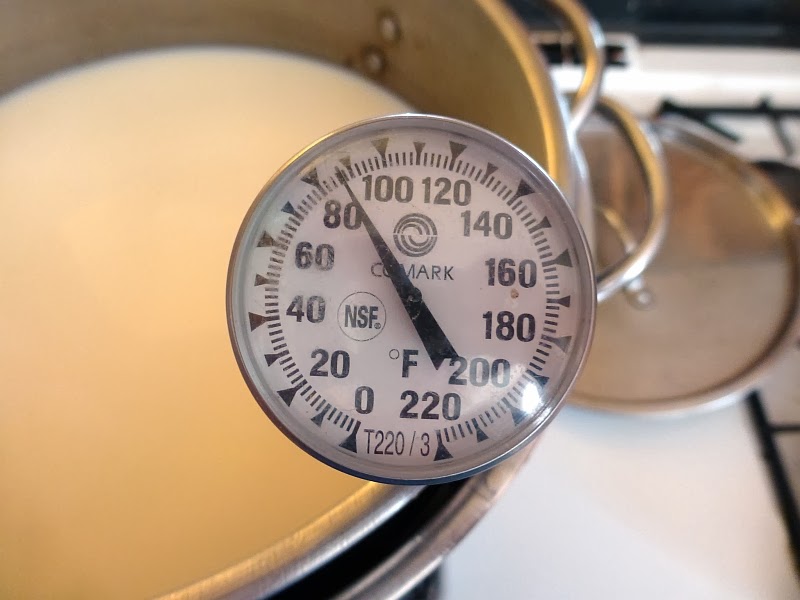
The biggest thing with making cheese is keeping an eye on the temperature. A thermometer is essential.
Anyway, I start with two gallons of whole milk. I nest my pots double-boiler style so nothing burns.
For the first step, the milk is brought to 86F.
Then I added several cubes of mesophilic culture. Because they're older, they're all sorta mashed together and fuzzy with ice but, as I found out, this didn't seem to affect the viability of the culture. It worked just fine.
Stir and let the cubes melt. Once they're melted and the culture stirred in, let the milk ripen undisturbed for 45 minutes.
Then I add rennet. Rennet coagulates the milk and separates the solid (curd) from the liquid (whey). It has two sources,
animal and
vegetable. Animal rennet is derived from the stomach of a suckling calf who has never had solid food. Vegetable rennet can be derived from stinging nettles.
I use liquid animal rennet, half a teaspoon diluted in a quarter-cup of cool water.
This is thoroughly mixed in, and then left alone for 45 minutes while it coagulates.
After this, the curds have to be cut. I like to use this long slim knife because it's long enough to go all the way to the bottom of the pot.
Curds have to be cut in a criss-cross direction, sliced about 1/2" apart. First one way...
...then cross ways...
...then on a diagonal both directions. This breaks the curds up as evenly as possible in a deep pot.
After the curds "rest" for five minutes, the next step is to gradually heat the curds to 100F over a period of half an hour. Took me awhile to get this step down, as I kept heating the curds too rapidly. During this process, the curds get stirred every few minutes.
When the curds reach 100F, maintain the temperature and stir once in awhile, for thirty minutes.
Then I leave the curds alone for 20 minutes to let them set. During this time, they will sink to the bottom of the pot. See? A waiting period here, a waiting period there... cheesemaking is a long process punctuated by a lot of time doing nothing.
While the curds rested, it was time to get out the cheese press. Long ago, we knew we couldn't afford one of those whiz-bang
shiny metal cheese presses ($280!!!), but when Don learned there were
plans available (for $5) to make a homemade
lever-arm cheese press, he announced "Plans? I don't need no stinkin' plans!" He disappeared into the shop and emerged a few hours later with a handmade lever-arm cheese press. Man, I love my woodworking husband!
He marked the arm with the standard weights I use: 20, 40, and 50 pounds. It turned out I often use 10 lbs. too, so I "wing it" on the arm.
The press has a bucket of sand/gravel/old nails used as a counter-weight.
I needed to make sure the weight was still accurate. So I brought the press outside along with the bathroom scale to test it.
First I tested it at 20 lbs, then at 40.
Yep, still accurate.
By this time the "resting" period for the curds was finished. Time to pour off the whey. Whey can be used to make ricotta, but I wasn't making ricotta this time so I just poured it down the drain.
After this, I set the colander with the curds over the top pot of the double boiler arrangement, to drain for 15 minutes.
I covered it with the lid to help keep the heat in.
At the end of 15 minutes, I flip the curds onto a cutting board with a towel underneath. The curds are still pretty juicy at this stage, and the towel catches the drips.
Then I slice the curds into big chunks, about three inches long.
I drain the whey out of the top pot of the double boiler, and put the chunks of curds back into the pot.
Then comes a two-hour interval where the curd pieces are maintained at 100F. The curds are flipped every 15 minutes. About every other "flip," I insert the thermometer and see how close the temperature is to 100F. At this stage the curds can handle a little fudge factor, so I don't fret if it's a few degrees one way or the other. If the curds are too cool, I turn the gas on low for a minute or two. If the curds are too warm, I pull the top pot out of the double boiler and let it sit on a towel for awhile.
At the end of two hours, the curd pieces are tough and resemble boiled chicken breast meat.
At this point, each piece needs to be diced. I cut lengthwise through each piece before cutting criss-cross.
Put all the diced pieces back into the pot. Cover and maintain the temperature at 100F for 30 minutes. Every ten minutes or so, I stir the pieces with my fingers -- not squeezing, just keeping the pieces from matting together. About halfway through this process, I add two tablespoons of cheese salt. "Cheese salt" is merely non-iodized table salt (apparently iodine can kill the lactic bacteria during the aging process).
At this point I get my
form and follower ready. These are tough polypropylene molds. The form (the cylindrical piece) is perforated, and the follower fits snugly inside to press the cheese. While I always advocate for homemade versions of things whenever possible, this is probably one of the few things I recommend buying new, if you plan to make a lot of cheese. It's not wildly expensive, and it will last forever.
I put the form on the floor of the cheese press...
...and line it with a thin piece of old clean sheeting. Some people swear by cheesecloth, but I hate the stuff (it tangles and is hard to re-use). Instead I keep large squares of old clean sheeting on hand for any number of uses, including dairy.
Then the diced curd pieces get stuffed into the form. And I mean
stuffed. Sometimes I have to press down to cram it all in, though in this batch it all fit easily.
Then I fold the excess cloth over the top, kinda stuff it in place. The idea is not to have any sheeting hanging over the edge. Makes for a lumpy top of the cheese, but oh well.
Then I fit the follower into the form, compressing both the curds and the wadded up sheeting beneath it.
Then I swing down the arm of the press and fit the foot into the follower.
Then I slide the weight onto the arm. The 10-pound line isn't marked, but we know about where it is. A little "fudging" won't hurt the cheese at this point. The weight stays at 10 lbs. for 15 minutes.
Right away, whey starts squeezing out of the curds. We always position the cheese press so the end tips over an old unused sink, to allow the whey to drain out.
At the end of 15 minutes, I remove the weight and lift the arm, which also lifts the foot. I remove the follower and flip the cheese upside down. Then I reinsert the follower and the foot.
This time I place the weight at 40 lbs.
The weight stays at 40 lbs. for twelve hours. Early the next morning, I flipped the cheese once again and set the weight at 50 lbs., where it stays for 24 hours.
Then I remove the cheese from the press...
...and push it out of the form.
I carefully peel the cloth from the cheese (I can wash and re-use the cloth). Can you see why people say the moon resembles green cheese?
I keep the cheese on a rack for about three days in order to form a rind. The rack allows air to get beneath the cheese to harden it on all sides.
Then it's time to wax the cheese. Cheese wax is different than paraffin wax. It's flexible and won't crack, and it can be cleaned and reused. I got a five-pound block of red cheese wax a few years ago. When it melted (which took hours!), I poured it into this el cheapo tin I got at a thrift store.
To wax cheese, I put the tin of hard wax in a pot of water
with a rack on the bottom of the pot, and slowly melt the wax. It will take at least an hour to melt, so here's another opportunity for patience. In theory wax can catch fire, so I keep the heat low.
Once the wax is melted, I lay a sheet of waxed paper next to the wax to catch the drips.
Then I pick up the cheese and dip the bottom half once, twice, three times. I let the wax cool for about ten seconds between dips.
I lay the cheese on the waxed paper, wax side up, for about two or three minutes to cool.
Then I pick it up by the waxed side...
...and dip the other half once, twice, three times.
I managed to wax my fingers.
I left a couple of bare spots, in this instance where my thumb was holding the cheese.
That's where the paintbrush comes in. I just painted wax over the bare spot.
After this I write the date on a small slip of paper...
...and paint a thin coat of wax over it to secure it to the cheese.
I'll age this cheese for about 2 1/2 months. The difficulty is finding a place to store it where it stays at a consistent 55F. I borrowed a neighbor's small dorm-size fridge and set it at its lowest setting, but it's far cooler than 55F, so right now I'm a bit stumped. Thoughts as to where I can find a 55F environment?
UPDATE: Thanks to reader recommendations, shortly after posting this blog post I purchased a used wine cooler refrigerator. It's worked perfectly to maintain the cheese temperature during aging.