

I say "only," because the man who built our house was an excellent rough carpenter but not the best finish carpenter. Over the years Don's had to correct a lot of issues.
But the cabinets and countertop were hand-crafted wood and quite lovely. Most homes have wood cabinets, but wooden countertops are less common. People (mostly, I'll admit, women) would often walk into our kitchen and gasp in admiration. It was such an earthy, lovely combination.
But, true to the nature of the guy who built the countertop, he misunderstood certain principles of wood, i.e. shrinkage. The countertop was beautiful, but the boards from which it was constructed had shrunk over time, resulting in gaps (sometimes very wide gaps) between the boards.

For sixteen years, we've dealt with debris falling through the cracks. (One time I defrosted some bags of garden strawberries on the countertop but neglected to put the bags in bowls. Sticky strawberry juice leaked between the gaps and dripped all over my spices, which I keep on a lazy Susan in the cabinet below. What a mess.)

In the last couple months, Don tackled a major home improvement project: making a new countertop. Talented man that he is, he worked hard to retain the best parts about the original countertop (the lustrous beauty of the wood) while eliminating the bad parts (the gaps between the boards).
He carefully planned everything on paper first, measuring and re-measuring and re-measuring again.


He used the same type of wood for the new counter, Spanish cedar. Here it is, my kitchen countertop in the raw!

This is a dowel jig, which spaces dowel holes exactly to measurement.


Use of this jig allows long boards to be matched up and joined together using dowels.

Once the holes were drilled, he used wood glue to hold the dowels...

...and added extra glue the length of the board as well.

Here are the dowels which join the boards together.

They're inserted into the pre-drilled holes, then hammered down.

Joining two boards together.

Clamps draw the boards together and hold them firmly in place until the glue dries.
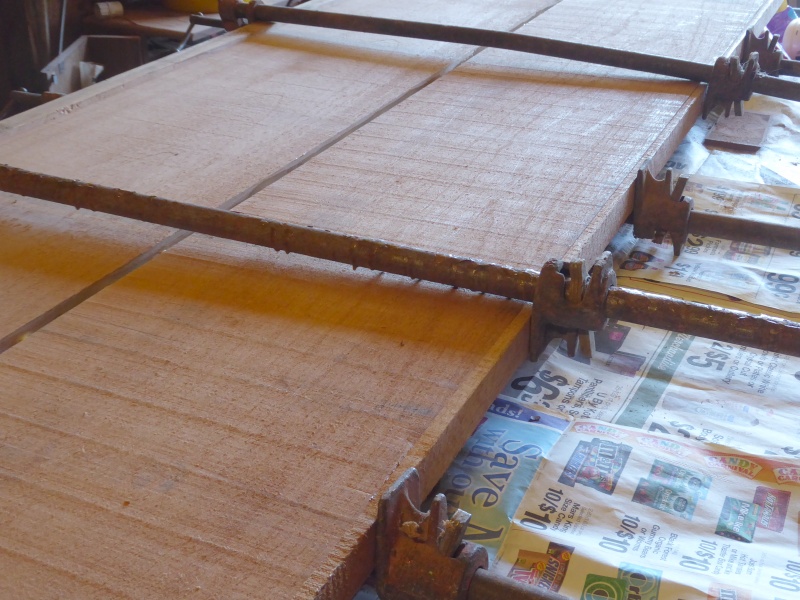
He uses a bit of pipe for extra torque when tightening the clamps.

This sat overnight to let the glue dry.

Using the same procedure, he added the L-shaped wing where the countertop bends around a corner near the stove.


We got a new sink for the occasion. Despite his careful measurements, Don took the precaution of making a cardboard cutout of the sink's dimensions before cutting the hole in the countertop where the sink will go. This is the part he really really didn't want to screw up.

Armed with both the measurements and the cardboard piece, he measured yet again and then cut.

The sink hole is smaller than the sink's lip that fits over the edge of the countertop.

He trimmed things to size using a circular saw with a fine-tooth blade.

Whew -- it fits!

Looking good so far!

And then the sanding started. He sanded and sanded and sanded, staring with 60 grit and ending with 220 grit. He sanded multiple times with the belt sander.

He used a palm sander to remove any scratches made by the belt sander. (The belt sander does a fast but sometimes rough job, and the palm sander cleans up any issues left over by the belt sander.)

After all the sanding was done, he used the shop vac to vacuum up all the sawdust.

Then it was time to coat. He started with three coats of wood hardener. This is a liquid plastic that's easily absorbed into the wood, then hardens. This step could be skipped with hard woods such as oak; but because he was using a relative soft wood (Spanish cedar), it was necessary to toughen the countertop.


Now the beauty of the wood emerges.


The first of three coats.

As helpful as wood hardener is, and no matter how well it does its job, it's something of a pain in the patookus. No matter how quickly or how smoothly it's applied, it tends to clump and get stringy as it dries. Then afterward, the wood surface needs to be sanded again, and the hardener residue gums up the sander. (Don used a lot of palm sander sandpaper during this process.) Additional rough spots needed to be scraped by hand.

Here, a portion of the wood is scraped, the rest is not scraped. The difference is dramatic.

Don let the hardener dry eight hours between coats of hardener. After the last coat was applied, he let the countertop dry for 48 hours.
Then it was time to apply varnish, the same Minwax high gloss varnish we use for our tankards.

He put on nine coats of varnish, letting the countertop dry between coats. After each coat dried, we rubbed the countertop down with xxx-grade steel wool (the slight scratching this causes helps the next coat of varnish stick better).

He used a spray gun for applying the varnish, same as with our tankards.

He also gave two coats of varnish to the underside of the countertop, just to seal things in. Since this didn't have to be as smooth, he used a brush instead of a spray gun.

Then the unit was complete. We brought it into the house and leaned it against the kitchen wall for a day or two, to let the wood adapt to ambient house temperature.

Then came the messy task of removing the old countertop and sink.


Naked kitchen!

When all the prep work was done, we lifted the new unit into place. It. Fit. Perfectly.

Look at that! Just look at it! No gaps!

Next step, the wood backsplash. While Don worked the wood, I scraped off the icky grungy silicon grout from the old backsplash.


For the backsplash, Don used half-inch oak to match the rest of the trim in the kitchen. He varnished the side facing out, and applied adhesive caulk on the side facing the wall.

He used a nail gun powered by the air compressor to fasten the backsplash in place.


To seal and waterproof the joint between the countertop and the backsplash, he used a line of dark brown latex caulk.

(And yes, I later touched up the paint.)

He also learned the excess latex caulk can be removed without smearing by dipping his finger in rubbing alcohol and wiping away the extra. He also used a cloth dipped in rubbing alcohol to remove any smears on the wood.

Beautiful, no?

After Don was finished with the wood parts, I ran masking tape and touched up the paint.

The result, folks, is the most beautiful kitchen countertop I've ever seen. Glorious! All thanks to my clever woodworking husband.

And best of all ... no gaps!
Beautiful work. Love the work of a fine craftsman. Anyone that talented will never be without work.
ReplyDeleteThat countertop is beautiful indeed! Wow! Please tell me that you have lots of cutting boards. Your hubby really is an artist!
ReplyDeleteThat's amazing work. Don is a master. I don't care what tools I used, I wouldn't be able to get all those dowel holes lined up correctly.
ReplyDeleteBeautiful job. This engineer picked up some great tips too. Design it yourself. Then BUILD IT!
ReplyDeleteMontana Guy
So beautiful!!!
ReplyDeleteWhen we had our house built I put in wood countertops. I love them!!!
Everyone I know who has wooden counters hates them because they burn, stain, etc so easily.
ReplyDeleteUse the right finish to start with then use hot pads and coasters, don't set wet things on them for very long, wipe them down immediately. I put wood countertops in our house and my wife love them. They're not really that hard to take care of.
DeleteKrab - I can understand people's feelings about wood for counter tops. It does take more effort to keep them nice. As Dave said, you have to keep standing water to a minimum and make sure to use cutting boards and heat shields. On the other hand, I used a great spar varnish for the finish. This means that any minor blemishes we create will be easily repaired (not so easily done on ceramics or stone surfaces). Of course it helps that I know how to do those repairs if it becomes necessary. It also helps that Patrice and I think nicks and dings are part of the beauty of living a full life. I've got plenty of those myself. - Don
DeleteCurrently dreaming of a wood counter— I have plastic-over-particleboard. Now THAT stains easily!! Everything requires cutting boards, hot pads, and that standing water be kept to a minimum. Except maybe granite (cutting board still required, though), which I have NO desire to pay for or maintain (to the degree that I would frankly sooner keep the plastic).
DeleteBy the time you get done, I think you'll have to stay put.
ReplyDeleteStunning!
ReplyDeletevery, very nice. Shadowfaxhound
ReplyDeleteBeautiful! Don’t you have such a feeling of accomplishment when you look at it?
ReplyDeleteWhew, a lot of work there, but so beautiful!
ReplyDeleteGorgeous. And if I may say, it appears that Don has lost a bit of weight.
ReplyDeleteI'm very lunar. I wax and wane (probably too much) Can't help it, I do love eating. But every couple of years or so I get back on the weights and cut my calorie count in half. I ought to stay at it. But...
DeleteBeautiful, Patrice & Don! I got tired just seeing all your painstaking work! How long did it take from start to finish?
ReplyDeleteGreat carpentry Don. I do have one suggestion, I'd like to see Don don a respirator, sawdust and aerosols are lung busters...
ReplyDeleteWhen I replaced my divided sink I opted for one with no division and have a goose neck faucet. It facilitates cleaning larger bowls and pots much easier that in a divided sink.
ReplyDeleteBIG fan of Spar Varnish. Takes rather a long time to cure, but it is TOUGH once done. Beautiful counter-top. Well done, Don!
ReplyDeleteI admire Don's woodworking skills. Very nice!
ReplyDeleteDon is in fact a master craftsman, wonderful job!
ReplyDelete