
I don't know why it didn't occur to me to put up a blog post about the process until I was halfway done with this latest batch, but there you go. So I apologise for not showing the eight or so gallons that were stacked in the fridge, or the process of ladling the cream into a large pot. But suffice it to say, I ended with this large pot (which holds two gallons) full of cream.


I heated it slowly to 60F.

For whatever reason, when cream is warmer or cooler than 60F, it takes too long to churn; but right around 60F, it churns quickly and easily... especially if you churn in a blender, which I do for the sake of convenience.
The blender shouldn't be more than half full, since it increases in volume during the churning process, plus it needs room to splash around.
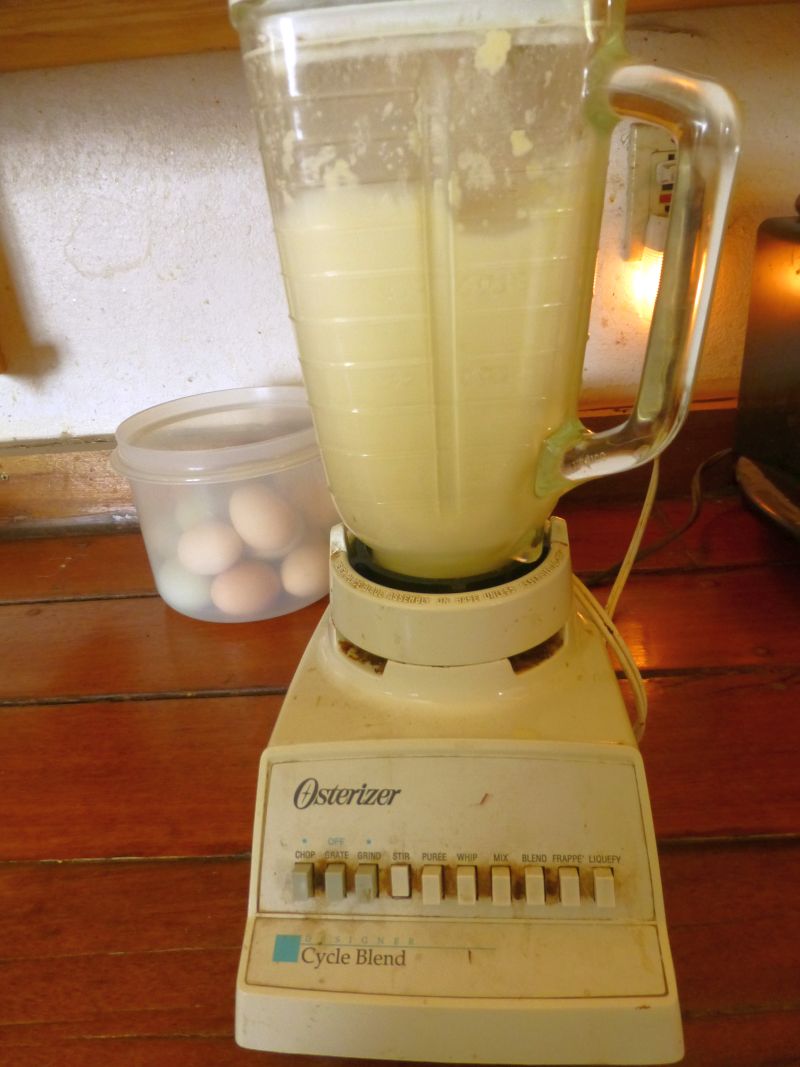
It takes maybe a minute (or less) for cream to churn to butter in the blender. You can "hear" when it's done because the motor changes tone as the contents become thicker. This is what it looks like after it's churned. Butter floats on top, buttermilk is at the bottom.

I line a colander in the sink with a large piece of clean sheeting, about 2x2 feet square, and pour the liquidy butter/buttermilk into the colander.

The colander will hold the contents of two bouts in the blender (this photo shows just one blender's worth).

When I've churned twice and dumped everything into the colander, it's time to squeeze out the buttermilk. You can save the buttermilk if you like, though I don't bother. It's not like the thick buttermilk you find in grocery stores, by the way. That's cultured buttermilk, which this isn't.
Gather up the corners of the cloth...

...then squeeze downward. I prefer "thick" sheeting rather than "thin" sheeting for this purpose. If the fabric is too thin or loose (like cheesecloth), it will squeeze out the butter along with the buttermilk.

After that, move the sheet over a large bowl...

...and strip the butter downward off the sheet into the bowl. It's messy, but the butter is so softy and liquidy it's very easy.

Repeat this process until the cream is all gone. I am able to set up a comfortable rhythm: While I'm stripping butter from the cloth, another batch is churning; then I dump the churned butter in the colander and set up another batch to churn while I squeeze and strip the butter, etc.
At the end, this is what the butter looks like. It's very watery and loose and bears little resemblance to the finished product.

The next step is to wash the butter. It's necessary to wash all the buttermilk out of the butter, or it will go rancid very quickly.
Run COLD water into the bowl...

...and start working the butter -- squeezing and flattening, squeezing and flattening.

The water will quickly get cloudy, and you'll feel the butter start to firm up.

Pour off the water and refill the bowl, always using cold water. I like to pour off the cloudy water over a colander, because sometimes little bits of butter get poured off too.

Repeat this process for as many times as necessary until the water comes clear - maybe nine or ten times. You can expect anywhere from 2 to 3.5 pounds of butter from two gallons of cream. This time I got 3.5 lbs, calibrated for the weight of the bowl.


The next step is to salt the butter. Salting isn't necessary, though it does improve the flavor and helps preserve it. Most instructions for making butter call for waaaay too much salt, in my opinion. Through trial and error, I've found one teaspoon of salt for three pounds of butter is just about right. If I had only one pound of butter, I'd add 1/3 teaspoon.

Sprinkle the salt over the butter and work it in until you can't feel the graininess of the salt any more. You'll probably work out a bit more water during this process, so just pour it off.
Then the butter is done. Since 3.5 lbs is more than we will use in the immediate, I froze the excess. I tore off three sheets of waxed paper and laid them on the counter, ready, then weighed out a pound of butter.

The butter is still very sloppy and loose since it's at room temperature, so I plop it onto the waxed paper and carefully roll it into a ball within the paper, tucking the side tails of the paper under the ball. This left me with half a pound left over, which I put in the fridge for immediate use.

I like to slip each pound of wrapped butter into a plastic Ziplock bag as well, before freezing.

That's all there is to making butter. From start to finish, including cleanup, takes about an hour. By the way, you'd think the piece of fabric I used to drain the buttermilk would be a mess to clean, but it's not. Under hot water, it's quite easy to rinse off the remains of the butter, after which I put the cloth in the wash.
As I see it, knowing how to make butter is just one more step toward self-sufficiency. After all, you can't get much closer to the cow than homemade butter.
Oh, and let's not forget... this butter is EXTREMELY RARE AND PRECIOUS, according to this article. LOL.
I love homemade butter! The only step that was new to me was the rinsing and kneading until clear--I've just give. A little rinse in the past. Good to know! Would a rubber scraper be easier in getting the butter off the cheesecloth?
ReplyDeleteI let my cream sit on the counter for 12-24 hours to let it culture, then my buttermilk is very thick and creamy. It makes great buttermilk pancakes and biscuits.
ReplyDeleteOne question, you said you hadn't made cheese because you need to cultivate a culture, how do you do that? I love to make cheese, but I always buy my cultures. I would be very interested to learn how to make my own cultures.
Your butter looks great!
What...?
ReplyDeleteYou mean I'm not supposed to be toasting and eating the sheet???
Who knew????
;)
This post brings back some fond memories.
I make it a point to keep lots of butter in the deep freeze. There is no life without butter!
A. McSp
We let our cream culture in jars on the counter for a couple days, before churning. It breaks much more easily than fresh cream. Of course, don't try this with pasteurized cream.
ReplyDeleteI love making velvetta cheese. It freezes well and can be used for so many things.
ReplyDeleteMmmmmm!
ReplyDeleteI may have told this story before, but it's worth repeating:
A friend of mine had a grandmother who lived past age 104. Whenever the grandmother asked what her secret was to such a long life, her one word answer was always, "BUTTER!"
Just Me
Great info!
ReplyDeleteOur chickens love the buttermilk left over when I make butter. Or sometimes I use it to make a batch of biscuits or pancakes. It's not cultured, but still adds a nice flavor.
ReplyDeleteI have a question I don't think you have ever addressed. What about your septic system....how often is it cleaned out..have you had any problems with it? I read your part about rinsing the butter down the drain and I am paranoid that I will ruin my septic.I am careful with bleach and grease. Am I being ridiculous?
ReplyDeleteYou're not being ridiculous at all. Plumbing is an important issue. Please see this post:
Deletehttp://www.rural-revolution.com/2014/04/plumbing-woes.html
- Patrice
I see several people on youtube that are canning butter. I am wondering why you haven't done this?
ReplyDeleteandy
Canning butter is not considered safe for home canners. In my ebooklet on “What NOT to Can” [http://www.countrylivingseries.com/product/what-not-to-can], I wrote: “The fat in dairy products can protect botulism spores and toxins from heat during the canning process. When milk is over-heated, the milk proteins drop out of suspension and separate. The amount of heat that would need to be used to kill botulism is so extreme that the food would be rendered inedible. For this reason, canning milk or canning butter is not recommended as a safe procedure for home canners.”
DeleteThis ebooklet was written in conjunction with Dr. Elizabeth Andress, Project Director for the National Center for Home Food Preservation (NCHFP) as well as Extension Food Safety Specialist at the University of Georgia. The NCHFP is a joint effort between the U.S. Department of Agriculture and the U of GA. Dr. Andress helps write or update the USDA guidelines for canning safety upon which all national guidelines are based, including such canning classics as The Ball Blue Book Guide to Preserving and Putting Food By, among many others.
In other words, if Dr. Andress says butter is not safe to can, I believe her.
Also, please see this link:
http://nchfp.uga.edu/questions/FAQ_canning.html#33
Thanks for the info.
ReplyDeleteandy